
Add your first game
Games are created and managed from the Catalog section of the Launcher Forge dashboard. Each Launcher Forge account currently uses one workspace and one launcher. Every game created in the Catalog belongs to that workspace and can later be connected to the existing launcher.New games are created as Draft by default.A draft remains inside the developer dashboard until you change its publishing status to Published and save the changes.
Configure launcher-game validation
Before publishing your first distributable build, connect the game runtime with the Launcher Forge launcher.This integration establishes the technical connection between the launcher and the game executable, allowing the launcher to recognize and validate the game it starts.Open the launcher-game validation guide →
How the complete process works
Creating a game in the Catalog is only the first part of the distribution process.- The Catalog entry contains the game information shown by Launcher Forge.
- The launcher-game validation establishes the trusted technical connection between the launcher and the game runtime.
- The published build contains the packaged game files.
- The linked game configuration makes the game available inside the launcher.
Before you begin
Prepare the following information:- The public game name.
- A description of the game.
- One or more genres.
- A cover image.
- A packaged game build for a later step.
- The engine integration you will use for launcher-game validation.
1. Open the Catalog
Sign in to the Launcher Forge dashboard. In the left sidebar, locate MY GAMES and select Catalog. The Catalog displays:- Total games.
- Published games.
- Draft games.
- Archived games.
- Search and status filters.
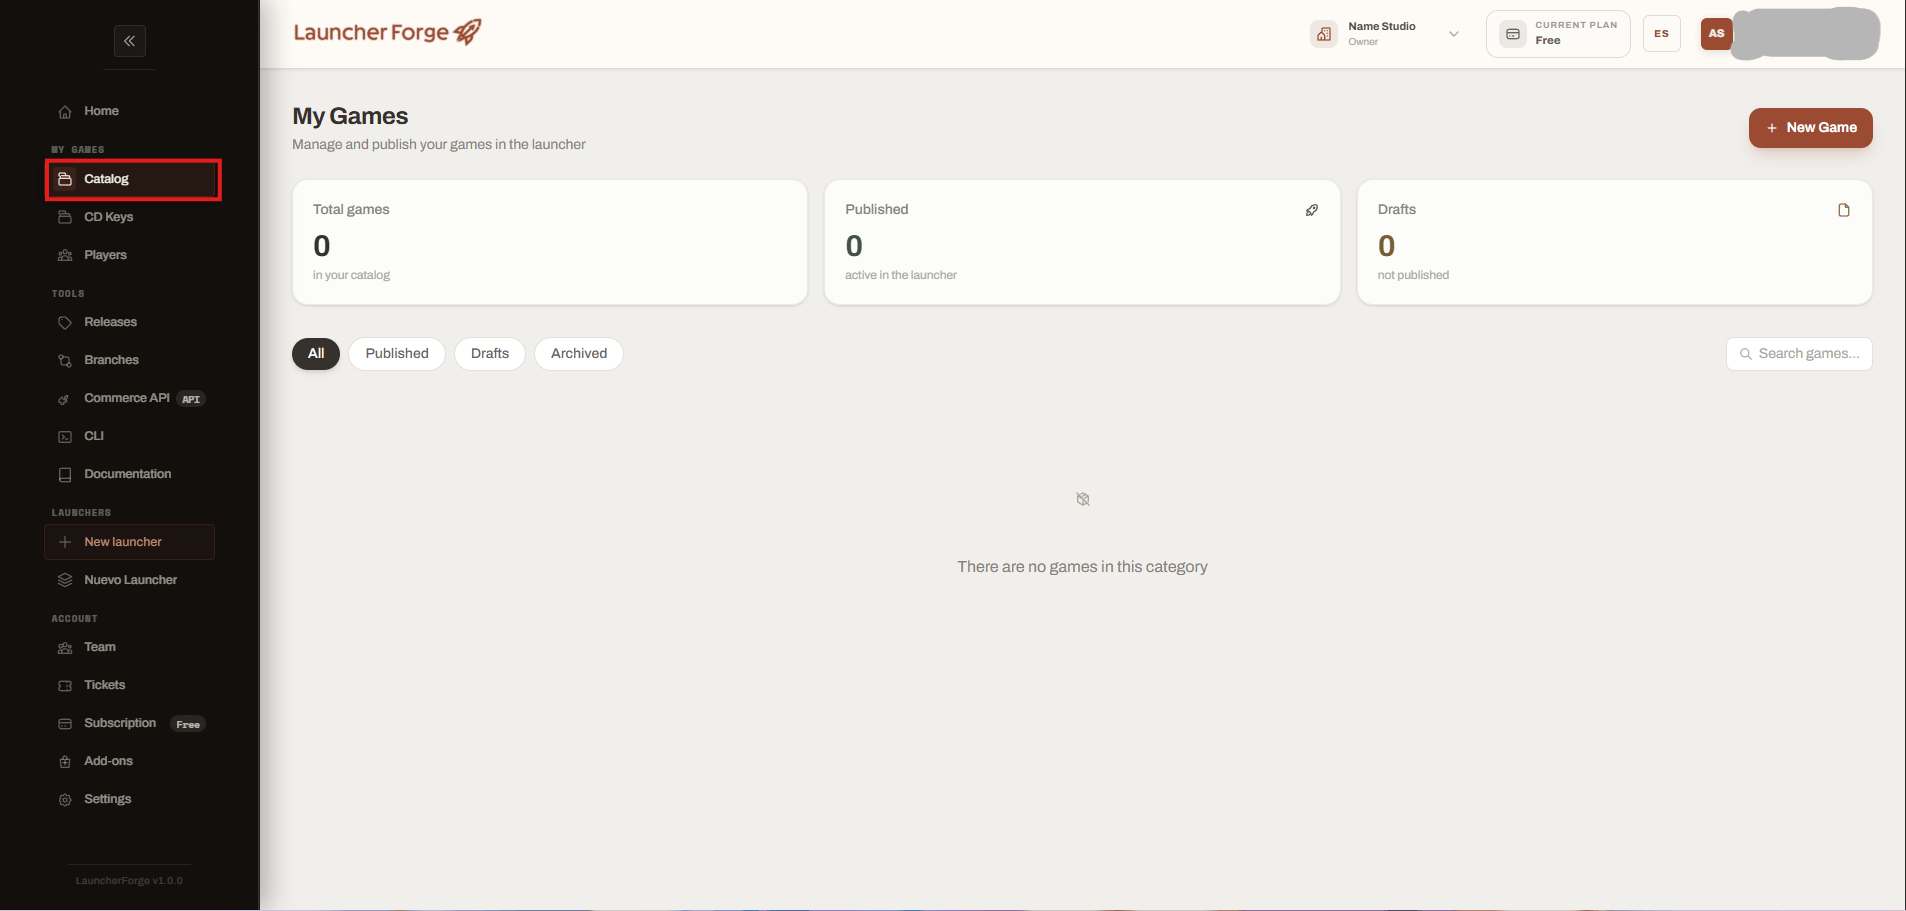
Open the Catalog and select New Game
2. Complete the initial game information
Launcher Forge opens the Create new game page. The interface indicates that the game will initially be created as a draft:Game name
Enter the public name that will identify the game throughout Launcher Forge. The name can appear in:- The Catalog.
- Launcher game cards.
- The launcher library.
- Release information.
- Game selection inside the CLI.
Description
Describe the game’s universe, mechanics, genre, or main proposition. The initial description supports up to500 characters.
Write information intended to describe the game to players. Avoid internal development notes, credentials, private URLs, or infrastructure information.
Genres
Select the genres that best represent the game. Available examples include:- RPG.
- Action.
- Adventure.
- Strategy.
- Puzzle.
- Simulation.
- Sports.
- Horror.
- Indie.
Game cover
The cover image is optional during the initial creation step, but adding one is recommended. The interface accepts:- PNG.
- JPG.
- WEBP.
- GIF.
10 MB.
Launcher Forge recommends a 1920 × 1080 image for better visibility inside the launcher.
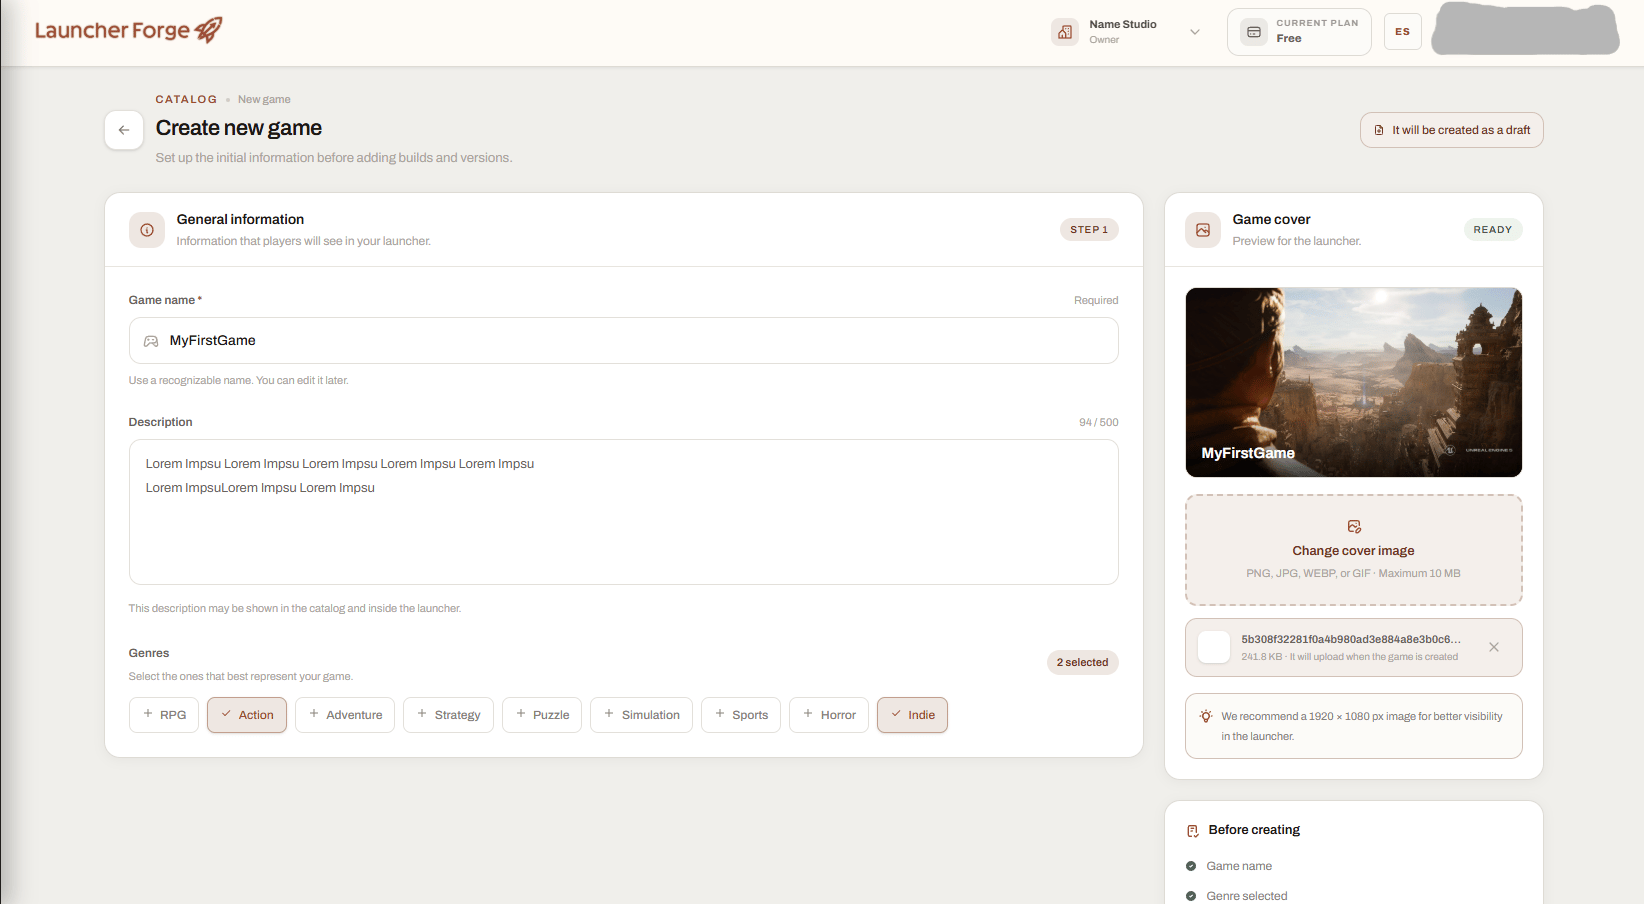
Complete the game information and optionally upload a cover
The game name and at least one genre are required. The cover is optional, but it improves how the game appears in the Catalog and launcher.
3. Create the game
After completing the required fields, submit the form. Launcher Forge creates the game and returns it to the Catalog. The newly created game appears with the Draft status. At this point:- The game exists in the Catalog.
- It does not have a published build.
- It is not linked to the launcher.
- Launcher-game validation may not be configured.
- It is not available for launcher distribution.
Draft is a preparation state. It allows you to configure the game before making its Catalog entry available for distribution.
4. Open the game editor
Locate the game card in the Catalog. Move the pointer over the card and select the pencil icon labeled Edit game.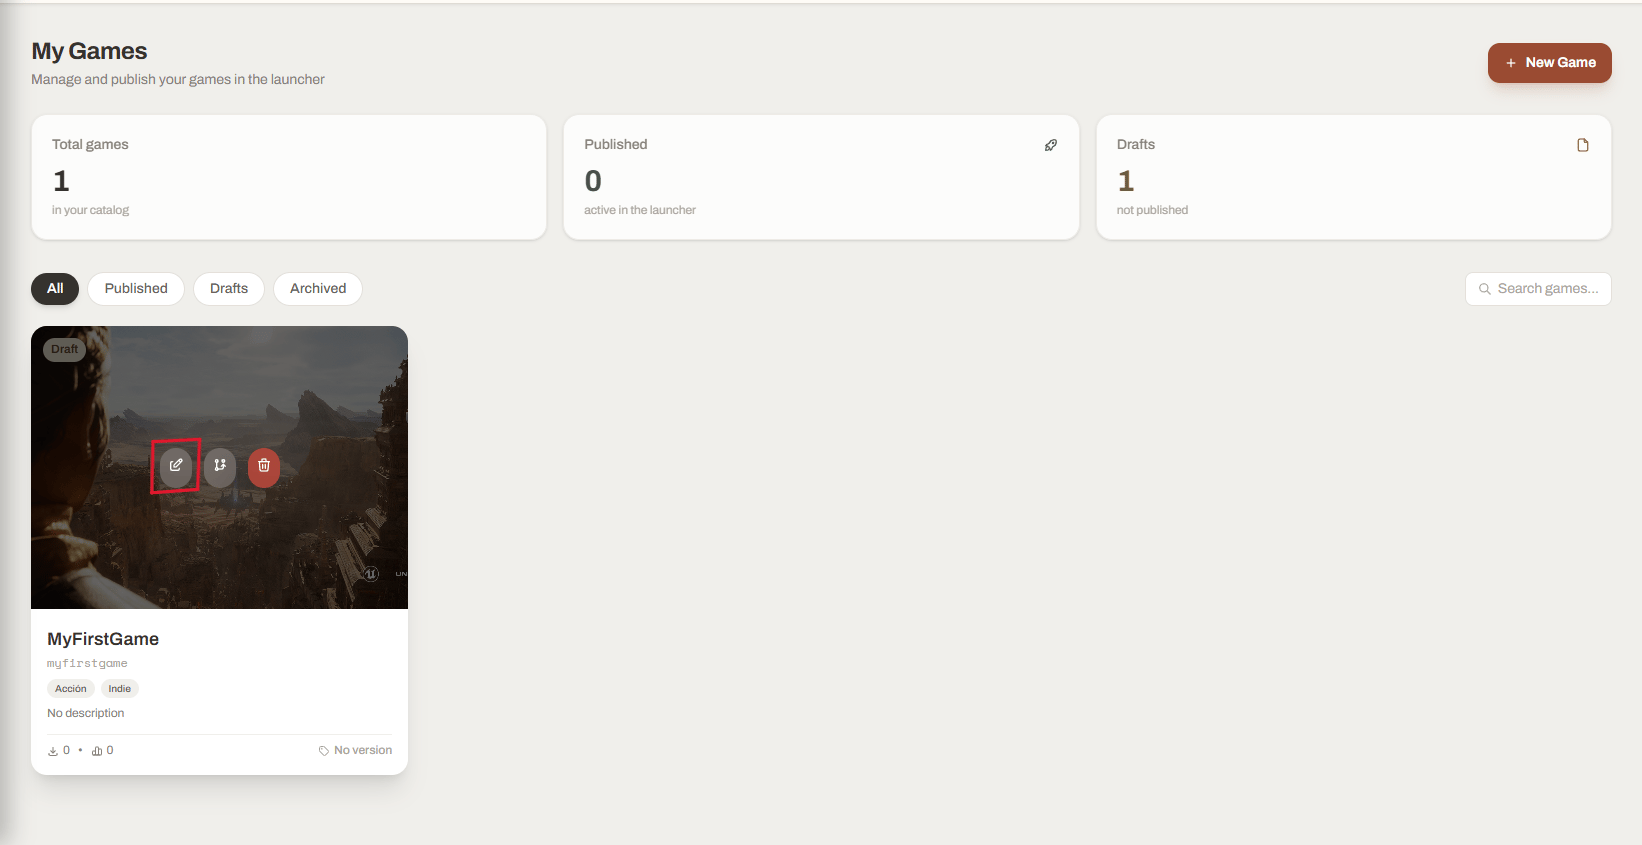
Open the draft game using the Edit game button
5. Review the game information
Inside the game editor, open the Information tab. Confirm:- Game name.
- Short description.
- Full description.
- Selected genres.
- Cover image.
- Banner image, when available.
- Other game metadata.
Publishing controls the status of the game entry. It does not upload a build, connect the game runtime, or link the game to the launcher.
6. Open the Publishing tab
Inside the game editor, select the Publishing tab.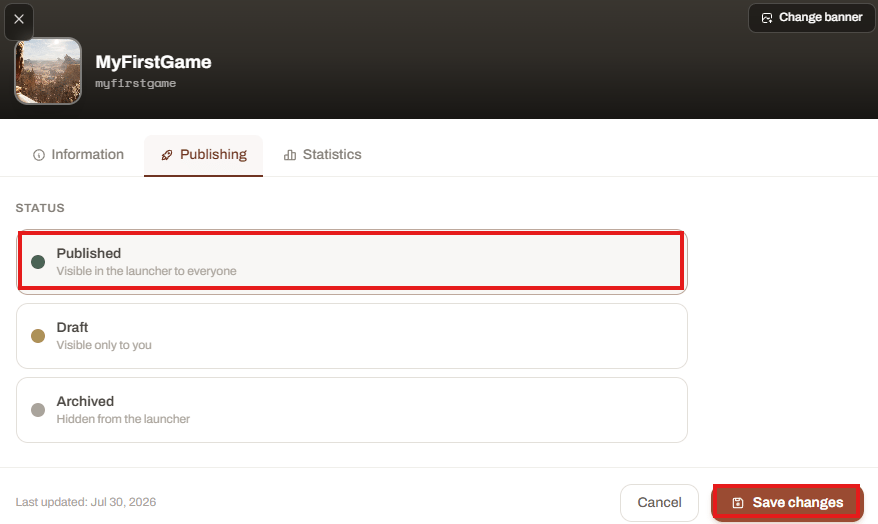
Open the Publishing tab in the game editor
7. Publish the game entry
Select Published. Then select Save changes.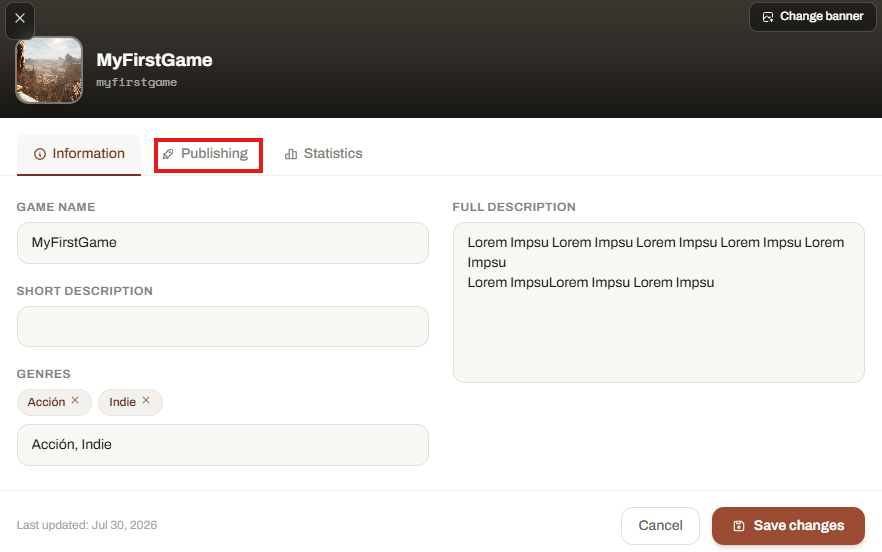
Select Published and save the changes
- The game stops being a draft.
- The game appears inside the Published filter.
- The published counter increases.
- The game becomes available to be linked to the launcher.
Publishing the game entry does not automatically add it to the launcher library. You must still link the game to the workspace launcher.
Draft, Published, and Archived
- Draft
- Published
- Archived
Use Draft while the game information is incomplete or while you are preparing:
- Images.
- Descriptions.
- Launcher-game validation.
- Branches.
- Builds.
- Release information.
Publishing the game is not publishing a build
Changing the game status to Published only controls its Catalog publishing state. It does not:- Upload the packaged game files.
- Generate a build manifest.
- Create a version.
- Publish a
STABLE,PATCH, orHOTFIXrelease. - Select the main executable.
- Configure launcher-game validation.
- Link the game to the launcher.
- Generate the launcher installer.
Configure launcher-game validation
Before uploading the first build intended for distribution, configure the technical connection between the launcher and the game runtime. This validation allows the Launcher Forge launcher to recognize and validate the game executable that it starts.- End-user registration.
- End-user login.
- Game ownership.
- CD key redemption.
- Player libraries.
Unreal Engine
Install and configure the Launcher Forge validation integration for Unreal Engine.
Unity
Install and configure the Launcher Forge validation integration for Unity.
Open the launcher-game validation guide
Review the validation flow, launch-token contract, runtime startup process, and engine integration requirements before publishing the first distributable build.Open Launch tokens →
Final verification
Before continuing, verify:- The game appears in the Catalog.
- Its status is Published.
- The game information is correct.
- At least one genre is selected.
- The cover is displayed correctly.
- The game is available to be linked.
- You selected the appropriate engine integration.
- Launcher-game validation is configured.
- The packaged game runs correctly on your computer.
- You are ready to create the first version through the CLI.
The game entry has been created and published successfully.
Next step
Configure launcher-game validation
Connect the game runtime with Launcher Forge and validate the launcher-game startup flow before uploading your first distributable build.Continue to Launch tokens →