> ## Documentation Index
> Fetch the complete documentation index at: https://docs.launcherforge.io/llms.txt
> Use this file to discover all available pages before exploring further.
# Add your first game
> Create a game from the Catalog, configure its information, and prepare it for builds and launcher distribution.
# Add your first game
A game represents the product that your players will install, update, and launch through Launcher Forge.
Games are created from the **Catalog** section of the developer dashboard.
Your account currently uses a single workspace and a single launcher. Every game you create belongs to that workspace and can later be linked to the existing launcher.
## Before you begin
Before creating the game, prepare:
* The final game name.
* A short description.
* The game genre.
* A cover image.
* A banner or background image, when required.
* The expected executable name.
* A packaged build that runs correctly on your computer.
You do not need to upload the game build during this step. Builds are published later through the Launcher Forge interactive CLI.
## 1. Open the Catalog
Sign in to the Launcher Forge dashboard.
In the left sidebar, find the **MY GAMES** section and select **Catalog**.
The Catalog contains every game registered in your workspace.
 ## 2. Create a new game
From the Catalog page, select the option to create a new game.
Depending on the dashboard language, the button may appear as:
* **New game**
* **Add game**
* **Create game**
Launcher Forge will open the game creation form.
## 2. Create a new game
From the Catalog page, select the option to create a new game.
Depending on the dashboard language, the button may appear as:
* **New game**
* **Add game**
* **Create game**
Launcher Forge will open the game creation form.
 ## 3. Complete the game information
Enter the information requested by the form.
### Game title
Enter the public name of the game.
Use the final name that should appear in:
* The launcher library.
* Game cards.
* Release pages.
* Player-facing screens.
### Slug
The slug is the stable identifier used by Launcher Forge in URLs and internal references.
Use lowercase letters, numbers, and hyphens.
For example:
```text theme={null}
my-first-game
```
Avoid changing the slug after publishing builds or sharing links related to the game.
### Description
Write a clear summary explaining what the game is about.
Keep it understandable for players and avoid internal development notes.
### Genre
Select the genre that best represents the game.
This information can be used to organize and display games inside the launcher.
## 3. Complete the game information
Enter the information requested by the form.
### Game title
Enter the public name of the game.
Use the final name that should appear in:
* The launcher library.
* Game cards.
* Release pages.
* Player-facing screens.
### Slug
The slug is the stable identifier used by Launcher Forge in URLs and internal references.
Use lowercase letters, numbers, and hyphens.
For example:
```text theme={null}
my-first-game
```
Avoid changing the slug after publishing builds or sharing links related to the game.
### Description
Write a clear summary explaining what the game is about.
Keep it understandable for players and avoid internal development notes.
### Genre
Select the genre that best represents the game.
This information can be used to organize and display games inside the launcher.
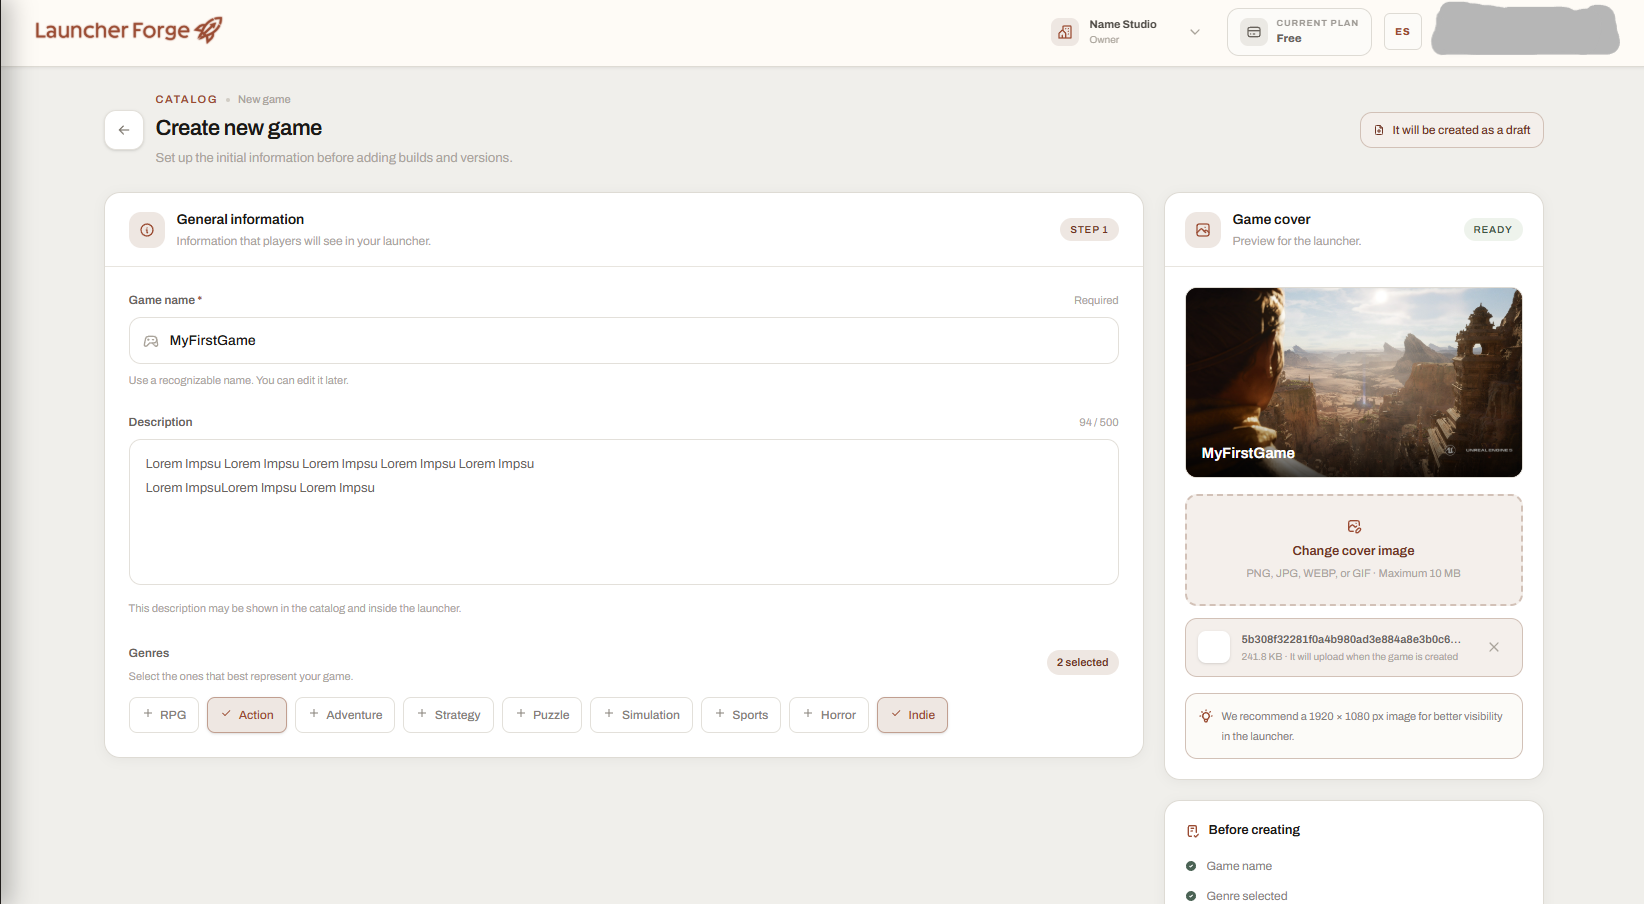 ## 4. Add visual assets
Add the images that will represent the game inside the launcher.
Used in the game catalog, cards, library entries, and compact game views.
Used in wider sections such as headers, hero areas, or expanded game views.
Use clear, high-quality images without important text too close to the edges.
The exact image requirements can depend on the launcher template.
## 4. Add visual assets
Add the images that will represent the game inside the launcher.
Used in the game catalog, cards, library entries, and compact game views.
Used in wider sections such as headers, hero areas, or expanded game views.
Use clear, high-quality images without important text too close to the edges.
The exact image requirements can depend on the launcher template.
 ## 5. Create the game
Review the entered information and submit the form.
After the game is created, Launcher Forge opens its management page or adds it to the Catalog.
The game should now appear as a registered product in your workspace.
The game has been created, but it does not contain a published build yet.
## 6. Configure the executable
The executable setting tells Launcher Forge which file must be started after the game has been installed.
Use a path relative to the root of the packaged build.
For example:
```text theme={null}
MyGame.exe
```
Or, when the executable is inside a folder:
```text theme={null}
Binaries/Win64/MyGame.exe
```
Do not use a path from your own computer:
```text theme={null}
C:\Users\Developer\Desktop\MyGame\MyGame.exe
```
That path only exists on your development computer and will not work for players.
## 5. Create the game
Review the entered information and submit the form.
After the game is created, Launcher Forge opens its management page or adds it to the Catalog.
The game should now appear as a registered product in your workspace.
The game has been created, but it does not contain a published build yet.
## 6. Configure the executable
The executable setting tells Launcher Forge which file must be started after the game has been installed.
Use a path relative to the root of the packaged build.
For example:
```text theme={null}
MyGame.exe
```
Or, when the executable is inside a folder:
```text theme={null}
Binaries/Win64/MyGame.exe
```
Do not use a path from your own computer:
```text theme={null}
C:\Users\Developer\Desktop\MyGame\MyGame.exe
```
That path only exists on your development computer and will not work for players.
 An incorrect executable path can allow the game to install successfully while preventing it from launching.
## 7. Review the game page
After creation, review the main game information:
* Title.
* Slug.
* Description.
* Genre.
* Cover and banner.
* Executable path.
* Installation configuration.
* Existing branches.
* Published versions.
At this point, the game exists in the Catalog but still needs a branch and a published build.
## 8. Link the game to the launcher
Open your launcher from the sidebar and enter the **Linked games** section.
Select the game you created and associate it with the launcher.
After linking it, the launcher management page should no longer show `0` linked games.
An incorrect executable path can allow the game to install successfully while preventing it from launching.
## 7. Review the game page
After creation, review the main game information:
* Title.
* Slug.
* Description.
* Genre.
* Cover and banner.
* Executable path.
* Installation configuration.
* Existing branches.
* Published versions.
At this point, the game exists in the Catalog but still needs a branch and a published build.
## 8. Link the game to the launcher
Open your launcher from the sidebar and enter the **Linked games** section.
Select the game you created and associate it with the launcher.
After linking it, the launcher management page should no longer show `0` linked games.
 Creating a game in the Catalog does not automatically publish it or upload its files. It must also be linked to the launcher and receive at least one published build.
## What happens next?
After creating and linking the game, you must:
Confirm that the executable path matches the packaged game structure.
Use the appropriate release channel, such as stable, beta, or development.
Package the game and test it locally.
Use the Launcher Forge interactive CLI to scan and upload the game files.
Install and launch the game from the generated launcher.
Do not generate and distribute the final launcher before confirming that the game is linked and has a valid published build.
## Next step
Continue with [Publish your first build](/en/getting-started/publish-first-build).
Creating a game in the Catalog does not automatically publish it or upload its files. It must also be linked to the launcher and receive at least one published build.
## What happens next?
After creating and linking the game, you must:
Confirm that the executable path matches the packaged game structure.
Use the appropriate release channel, such as stable, beta, or development.
Package the game and test it locally.
Use the Launcher Forge interactive CLI to scan and upload the game files.
Install and launch the game from the generated launcher.
Do not generate and distribute the final launcher before confirming that the game is linked and has a valid published build.
## Next step
Continue with [Publish your first build](/en/getting-started/publish-first-build).